
A good streaming setup is one you can upgrade one piece at a time without replacing the rest. This guide ranks the ten parts of a Twitch streaming setup from the component that matters most to the one you can live without, with specific models, list prices and the OBS settings that go with them. It is written for new streamers who want to start cheap and for affiliates who are ready to spend on the right thing.
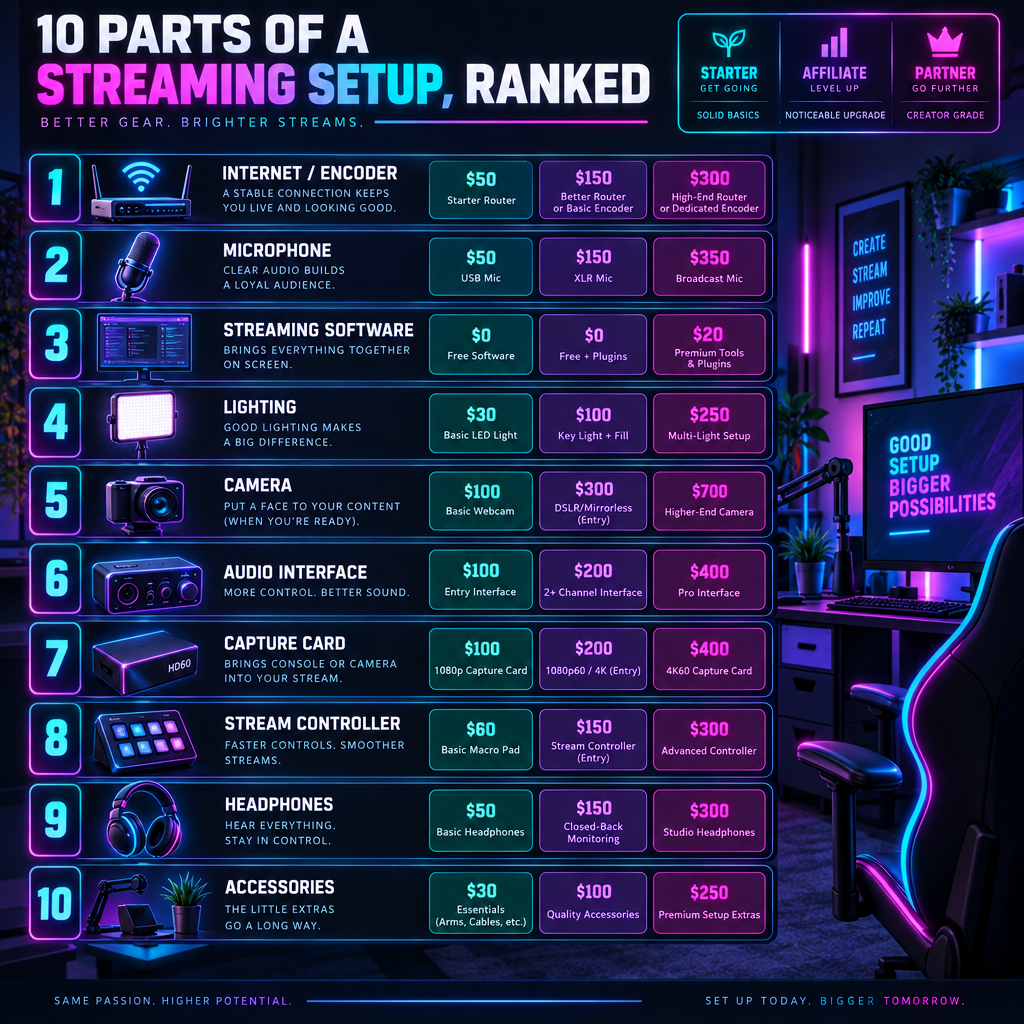
The quick list: 10 parts of a streaming setup, ranked
Ranked by how much each part changes what viewers actually see and hear, per dollar spent.
- Internet connection and encoder (your PC’s GPU or your console’s built-in broadcaster). Nothing else matters if the stream stutters.
- Microphone. Top pick: Samson Q2U to start, Shure SM7B when you can justify it.
- Streaming software and scene design. OBS Studio, free.
- Lighting. Top pick: Elgato Key Light Air. A $130 light does more for your image than a $300 camera.
- Camera. Top pick: Elgato Facecam MK.2 for USB, Sony ZV-E10 II for a mirrorless step up.
- Audio interface or mixer. Top pick: Focusrite Scarlett Solo (4th Gen) for one mic, RØDECaster Duo for a full desk.
- Capture card. Only for console or dual-PC streamers. Top pick: Elgato HD60 X.
- Stream controller. Top pick: Elgato Stream Deck MK.2.
- Headphones and monitoring. Top pick: Audio-Technica ATH-M50x.
- Accessories. Mic arm, pop filter, cable management, a second monitor for chat.
Overall top pick for a first purchase: a dynamic USB/XLR microphone such as the Samson Q2U. It fixes the number one reason viewers leave within 30 seconds, which is bad audio, and it keeps working when you move to an XLR interface later.
Quick-reference comparison table
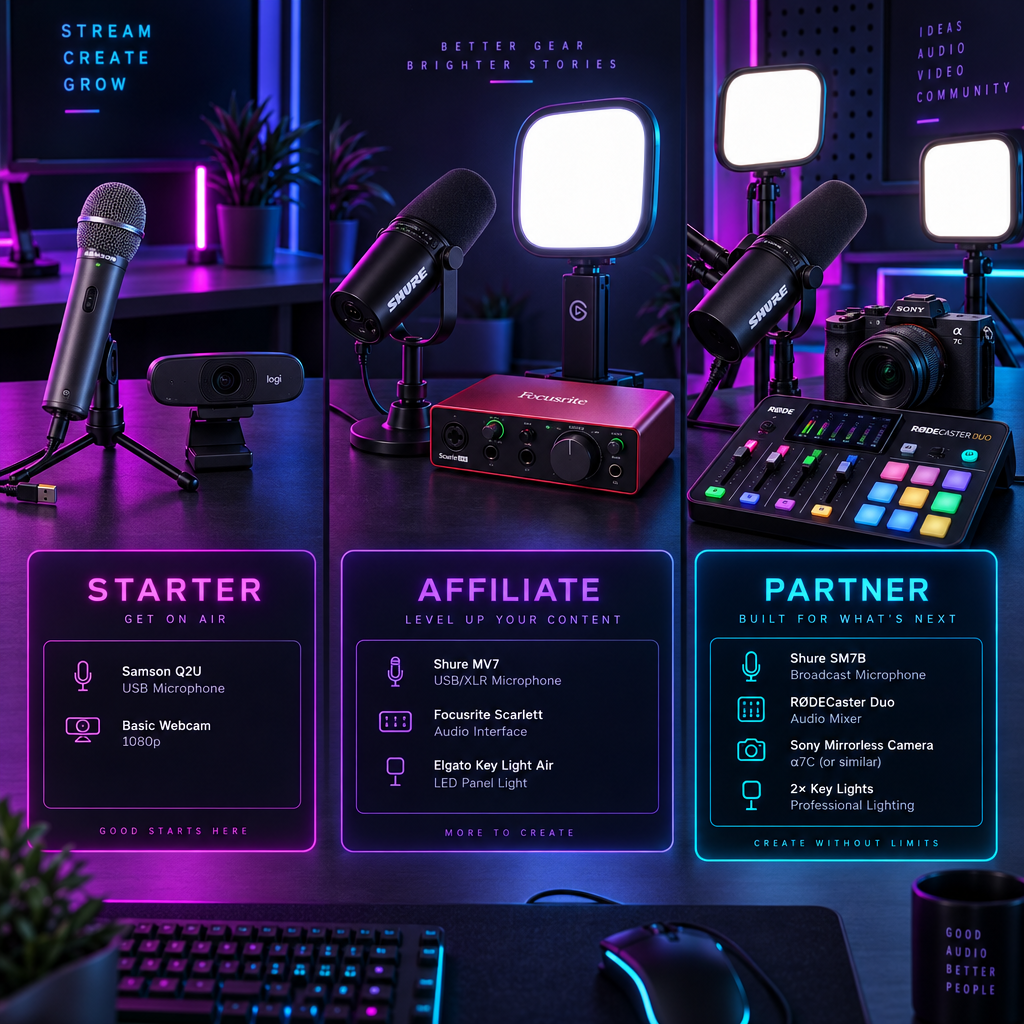
| Part | Starter pick | Affiliate pick | Partner pick |
|---|---|---|---|
| Microphone | Samson Q2U (about $70) | Shure MV7+ ($279) | Shure SM7B ($439) + interface |
| Interface | None, USB mic | Focusrite Scarlett Solo 4th Gen ($160) | RØDECaster Duo ($499) |
| Camera | Logitech C920 (about $70) | Elgato Facecam MK.2 ($150) | Sony ZV-E10 II + lens |
| Lighting | Window plus a desk lamp | Elgato Key Light Air ($130) | Two Elgato Key Lights ($200 each) |
| Capture card | Not needed for PC games | Elgato HD60 X (about $160) | Elgato 4K Pro (PCIe) |
| Controller | Stream Deck Mini ($80) or phone app | Stream Deck MK.2 ($150) | Stream Deck + ($200) |
| Software | OBS Studio | OBS Studio + plugins | OBS Studio, dual PC via NDI |
| Encoder | Console built-in or GPU NVENC | RTX 40 series NVENC | Dedicated streaming PC |
Prices are list prices at the time of writing. Street prices drop below list for most of these items during sales, so treat the figures as ceilings.
How we picked
Four criteria drove every pick in this guide.
Upgrade path over peak quality. Each pick should still earn its place after you upgrade the parts around it. A USB-only microphone fails this test; a USB/XLR hybrid passes it.
Latency and reliability on Twitch specifically. Twitch caps standard broadcasts at 6,000 kbps and expects a keyframe interval of 2 seconds. Gear and settings that fight those limits got marked down.
Real cost. Hidden extras count. The Shure SM7B needs an interface with around 60 dB of clean gain or an inline booster, so its real price is closer to $600 than $439.
Setup time. You should be live within an evening. Anything that needs a driver hunt, a firmware flash and a forum thread was ranked lower unless the payoff was large.
1. Internet connection and encoder
Your encoder is whatever turns gameplay into a video stream. On PC that is your graphics card. On PS5 and Xbox Series X|S it is a chip inside the console. Your internet connection carries the result.
Start with the upload speed. Twitch’s documented ceiling is 6,000 kbps, which is 6 Mbps, and you want at least 1.5 times your bitrate in sustained upload headroom. That puts the practical floor for a 1080p60 stream at about 10 Mbps upload. Run a speed test at the time of day you plan to stream, because evening congestion is when most dropped frames happen.
Use Ethernet. Wi-Fi 6 is fast on paper but a single microwave, a neighbour’s router or a thick wall will produce frame drops that look identical to an encoder problem. A 10 metre Cat 6 cable costs less than a pizza and solves it.
On the encoder side, any NVIDIA RTX card from the 20 series onward has a dedicated NVENC block, which means encoding happens on separate silicon and barely touches game frame rate. RTX 40 and 50 series cards add AV1 encoding, which looks cleaner than H.264 at the same bitrate. AMD’s Radeon RX 7000 series also encodes AV1 and Intel’s Arc cards do too. Older AMD cards can stream, but the H.264 encoder quality is a step behind NVENC at 6,000 kbps.
If you are shopping for a new “gaming pc” with streaming in mind, the GPU encoder matters more than raw frame rate. A mid-range RTX card with NVENC will produce a better-looking stream than a faster card without a hardware encoder, because you will be able to keep game settings high while the encoder works separately.
Twitch’s Enhanced Broadcasting, which opened as a beta in 2024 with OBS Studio 30.1, moves transcoding onto your own GPU. OBS sends several quality versions at once so viewers on slow connections get a lower-quality option even if your channel has no Twitch-side transcoding. It needs a supported encoder and OBS 30.1 or later. For a new affiliate without guaranteed transcodes, it is the single best free upgrade you can turn on.
Analyst note
Twitch’s own broadcast guidelines pair 1080p at 60 fps with 6,000 kbps, and 720p60 with 4,500 kbps. If your upload cannot hold 6,000 kbps with headroom, a sharp 720p60 stream at 4,500 kbps beats a blocky 1080p every time.
2. Microphone: the first thing to spend money on
Viewers forgive a soft webcam. They do not forgive a hollow, echoing microphone, and they leave before you notice. Audio is the highest-impact purchase in the whole streaming setup.
Best starter: Samson Q2U
The Q2U is a dynamic microphone with both USB and XLR outputs for about $70. Dynamic capsules reject room noise, so your mechanical keyboard and the fan in your PC stay out of the stream. It ships with a desk stand, a windscreen and both cables. When you later buy an interface, you plug the same microphone into it over XLR and keep going. The Audio-Technica ATR2100x-USB is the same idea at a similar price.
Best for affiliates: Shure MV7+
The MV7+ lists at $279 and is a USB-C and XLR hybrid with a built-in touch panel, auto level mode and a digital popper stopper that removes plosives in software. It sounds close to the SM7B at half the price and works straight from a USB port without an interface. The RØDE NT-USB+ ($169) is the condenser alternative if your room is quiet and treated.
Best for partners: Shure SM7B
The SM7B has been the broadcast standard for decades and lists at $439. It is a dynamic XLR microphone with very low output, so it needs an interface that can supply roughly 60 dB of gain without hiss, or an inline preamp such as a Cloudlifter CL-1 between the mic and the interface. The reward is a warm, controlled sound that holds up when you lean in, shout or whisper. Budget for the interface before you buy it.
Mic placement
Placement beats price. Put a dynamic mic 5 to 10 cm from your mouth, slightly off-axis so your breath does not hit the capsule straight on. A boom arm keeps the mic in that position without cluttering the desk. Set the gain so your normal speaking voice peaks around minus 12 dB in the OBS audio mixer, with loud reactions reaching minus 6 dB and never hitting zero.
3. Streaming software: OBS Studio and the scenes that matter
OBS Studio is free, open source and what most full-time streamers use. Streamlabs Desktop and Twitch Studio are friendlier on day one, but Streamlabs uses noticeably more CPU and Twitch Studio was discontinued, so learning OBS from the start saves a migration later.
OBS output settings for Twitch
These values are for a 1080p60 stream on an NVIDIA RTX card. Set Output Mode to Advanced first.
| Setting | Value | Why |
|---|---|---|
| Encoder | NVIDIA NVENC H.264 (or AV1 with Enhanced Broadcasting) | Offloads encoding from the CPU |
| Rate Control | CBR | Twitch requires constant bitrate |
| Bitrate | 6000 Kbps | Twitch’s documented maximum for standard broadcasts |
| Keyframe Interval | 2 s | Twitch’s recommended value for clean playback |
| Preset | P5 (Slow, Good Quality) | Best quality that RTX 30/40/50 cards hold at 1080p60 |
| Tuning | High Quality | Better motion handling than Low Latency |
| Profile | High | Required by most players for 1080p |
| Look-ahead | Off | Saves GPU headroom with little visible gain at CBR |
| Psycho Visual Tuning | On | Sharper detail on busy scenes |
| Max B-frames | 2 | Better compression without extra latency |
In Settings > Video, set Base (Canvas) Resolution to 1920×1080, Output (Scaled) Resolution to 1920×1080, Downscale Filter to Lanczos and Common FPS to 60. In Settings > Audio, set the Sample Rate to 48 kHz, which matches most interfaces and avoids resampling artifacts.
The four scenes every channel needs
- Starting Soon with a countdown and your music, so early arrivals know you are coming.
- Live with game capture, camera and a small alert region.
- Be Right Back that mutes your mic and hides the camera.
- Ending with a message pointing to your schedule and a raid target.
Use Game Capture for games rather than Display Capture. Game Capture hooks the game directly, so Discord notifications and your browser never appear on stream.
Quick steps: go live on Twitch from OBS Studio
- Install OBS Studio 31 or later and run the Auto-Configuration Wizard once.
- Open Settings > Stream, choose Twitch, click Connect Account.
- Open Settings > Output, set Output Mode to Advanced and enter the values from the table above.
- Add a Game Capture source, then your microphone under Settings > Audio > Mic/Auxiliary Audio.
- Click Start Streaming, then check the stats dock for dropped frames for the first five minutes.
Stay safe
Never use the stream key field on screen and never paste the key in Discord. Connect Account in OBS avoids showing it at all. Turn on Discord’s Streamer Mode under User Settings > Streamer Mode so invite links and your email are hidden while OBS is running.
4. Lighting: the cheapest big upgrade
Every webcam sensor is small, and small sensors need light. A $70 webcam under a good light beats a $300 webcam in a dim room, because noise, smearing and auto-exposure hunting all come from the camera trying to see in the dark.
Best pick: Elgato Key Light Air
The Key Light Air lists at $130, puts out up to 1,400 lumens and adjusts from 2,900 K to 7,000 K colour temperature. It mounts on a desk stand, runs from a wall adapter and is controlled from the Elgato Control Center app or a Stream Deck. The full-size Key Light ($200) doubles the output to 2,500 lumens for larger rooms. Both are edge-lit panels with a diffuser, so they produce soft light without the harsh shadows of a bare bulb.
Budget alternative
A Neewer 660 LED panel with a softbox, or any bi-colour panel around 10 inches, will do the job for under $60. The difference is build quality and app control, not the quality of the light itself.
Placement
Put the main light about 45 degrees to one side of your face, slightly above eye level, pointing down. Set it to 5,600 K to match daylight if you have a window, or 4,000 K for a warmer evening look. Keep RGB strips and lamps behind you, never in front, so their colour hits the wall and not your face. One light placed well looks better than three placed badly.
5. Camera: webcam first, mirrorless later
Cameras are where new streamers overspend. Until you have lighting sorted, a camera upgrade changes very little. Once the light is right, the sensor size starts to matter.
Best starter: Logitech C920 or C922
The C920 has been the default streaming webcam for over a decade and costs about $70. It does 1080p at 30 fps with a 78 degree field of view. The C922 adds 720p at 60 fps and background removal. Both are fine with a key light, soft without one.
Best USB webcam: Elgato Facecam MK.2
The Facecam MK.2 lists at $150 and records 1080p at 60 fps with a fixed-focus lens that never hunts. Elgato’s Camera Hub app gives manual control over exposure, white balance and shutter speed, which is what separates a stream that looks consistent from one that flickers every time you move. It also offers HDR for mixed lighting. The Facecam Pro ($300) steps up to 4K60, which is overkill for a Twitch camera box but useful if the same camera doubles for YouTube recording.
Mirrorless for partners: Sony ZV-E10 II
A mirrorless camera with a fast lens produces the blurred background and skin tones that no webcam can match. The ZV-E10 II is popular with streamers because it supports USB streaming as a webcam (UVC) over its USB-C port, so you can skip a capture card entirely. Pair it with a Sigma 16mm f/1.4 lens for a wide, bright image at desk distance. If you want HDMI capture for lower latency, the Elgato Cam Link 4K ($130) turns any clean HDMI output into a webcam. Buy a dummy battery adapter so the camera runs from the wall; internal batteries will not last a four-hour stream.
A webcam is the right call for most channels under 100 average viewers. The money is better spent on audio and light until then.
6. Audio interface or mixer
A USB microphone bundles the interface inside the mic. An XLR setup splits them, which costs more but lets you upgrade either half independently and gives you real gain knobs and hardware mute.
Best for one mic: Focusrite Scarlett Solo (4th Gen)
The 4th Gen Solo lists at $160, delivers 69 dB of gain on its mic preamp and includes an Air mode that adds presence. That gain figure is enough to drive a Shure SM7B at usable levels without a Cloudlifter, which was not true of older interfaces. It is bus powered, so one USB-C cable handles everything.
Best for streamers who manage multiple sources: RØDECaster Duo
The RØDECaster Duo lists at $499 and is a mixer in the broadcast sense. It has two XLR inputs, a Bluetooth channel for phone calls, a USB channel for game audio and six programmable pads for sound effects. The key feature for streamers is the multitrack USB output, which sends your mic, game, Discord and music as separate channels into OBS. That means you can mute music on the VOD or drop Discord from the recording with one checkbox. The Elgato Wave XLR ($160) is the smaller option: one XLR input, a big volume knob, and Elgato’s Wave Link software for mixing separate audio channels on the PC side.
What to look for
Two numbers decide whether an interface suits a dynamic mic. Gain above 60 dB means you can skip an inline booster. Equivalent input noise below minus 125 dBu means that gain will be clean. The 4th Gen Scarlett range and the RØDECaster both clear these.
7. Capture cards: for consoles and dual-PC rigs
If you stream PC games from the same PC that runs OBS, you do not need a capture card. Game Capture already grabs the frames. Capture cards matter in two cases: streaming a PS5, Xbox or Switch through a PC, or splitting game and encoding across two PCs.
Best pick: Elgato HD60 X
The HD60 X captures at 1080p60 or 1440p60 and passes a 4K60 signal through to your monitor untouched, so you play at full quality while the card sends a 1080p copy to OBS. It uses USB 3.0, needs no driver on Windows 10 and 11 and lists at around $160. It also supports variable refresh rate passthrough, which matters if your monitor runs 120 Hz from a PS5.
Step up: Elgato 4K X or AVerMedia Live Gamer 4K 2.1
The 4K X ($230) captures at 4K60 and passes through up to 4K144 over USB 3.2. The AVerMedia Live Gamer 4K 2.1 is the PCIe equivalent with the same 4K144 passthrough, suited to a dedicated streaming PC with a free slot. The Elgato 4K Pro is Elgato’s PCIe card with 4K60 HDR capture.
Dual PC without a card
If both PCs sit on the same gigabit network, the DistroAV plugin (formerly obs-ndi) sends the gaming PC’s OBS output over Ethernet to the streaming PC with no capture card at all. It costs nothing and works well at 1080p60 on a wired connection. The capture card route adds reliability because it does not depend on the gaming PC running OBS.
8. Stream controller: the Stream Deck question
A Stream Deck is a grid of customisable LCD buttons. It replaces hotkey combinations you will forget with icons you will not. New streamers do not need one. Streamers who change scenes, mute mics, trigger alerts and run chat commands mid-game benefit from it every single stream.
Best pick: Elgato Stream Deck MK.2
The MK.2 has 15 keys and lists at $150. Profiles switch automatically when a game launches, folders nest buttons, and the plugin store covers OBS, Twitch, Discord, Spotify and Elgato’s own lights and cameras. The Stream Deck + ($200) swaps seven keys for four rotary dials, which is better for volume control. The Stream Deck Neo ($100) has eight keys and an info bar, and the Mini ($80) has six.
Free alternative
Elgato’s Stream Deck Mobile app and the open-source Touch Portal run on a phone or tablet. They work but a second screen in your eyeline competes with chat for attention. A physical deck you can press without looking is the real upgrade.
Buttons worth setting up first
Scene switch to Live, Scene switch to BRB, mic mute, Twitch marker, Twitch clip, Discord mute, and a “shout out” command for raids. That is seven keys, which fits the Neo or Mini if money is tight.
9. Headphones and monitoring
You need to hear game audio, Discord and your own alerts without any of it leaking into the microphone. That rules out speakers for anyone using a condenser mic, and it is a bad idea with a dynamic mic too.
The Audio-Technica ATH-M50x ($169) is the long-running studio standard: closed back, flat enough to judge your own mix and tough enough for daily use. The Sennheiser HD 280 Pro is the cheaper closed-back option around $100. Gaming headsets with built-in mics work for monitoring, but their microphones are usually worse than a $70 dynamic on an arm, so do not plan to use the headset mic on stream.
Set up monitoring in OBS under Settings > Audio > Advanced > Monitoring Device, then set Audio Monitoring to “Monitor and Output” on your alert sources so you hear what viewers hear.
10. Accessories that earn their place
Most streaming accessories are decoration. These four change the stream.
Boom arm. The Elgato Wave Mic Arm LP ($100) is a low-profile arm that sits beneath monitor height, so the mic stays close to your mouth without blocking the camera. The RØDE PSA1+ is the taller alternative.
Pop filter or foam windscreen. The Q2U and SM7B both ship with one. A $10 foam cover on any dynamic mic kills most plosives.
Second monitor. Chat, OBS and your alerts on a second display mean the game stays full screen on the first. A used 1080p 24 inch panel does this for under $100.
Cable management. Velcro ties and an under-desk tray cost $20 and prevent the mic cable from brushing the desk, which is the most common source of mystery thumps on stream.
Green screens, RGB panels and shelf decor come last. They improve the look of a stream that already sounds and runs well; they do nothing for one that does not.
Three stages of a streaming setup that scales
This is the model the rankings above are built around. Each stage adds parts without throwing away the last stage.
Stage 1: zero to Affiliate ($0 to $150)
Twitch Affiliate needs 25 followers, 240 minutes broadcast across four different days, and an average of three concurrent viewers, all within a rolling 30 day window. None of that depends on gear. Stream from your console’s built-in broadcaster or OBS on the PC you already own. Buy the Samson Q2U and a cheap boom arm. Use a window and a desk lamp for light. Put the money you saved into a consistent schedule, because viewers return to a time slot, not a camera.
Stage 2: Affiliate to 50 average viewers ($400 to $800)
Now you earn subs and bits, and transcoding is no longer guaranteed, so Enhanced Broadcasting matters. Add the Elgato Key Light Air, the Facecam MK.2 and a Stream Deck MK.2. Move the Q2U to XLR through a Scarlett Solo, or replace it with a Shure MV7+. Turn on Twitch’s Enhanced Broadcasting in OBS so viewers on mobile get a 480p option when your channel has no transcodes.
Stage 3: Partner track ($1,500 and up)
Twitch Partner requires 25 hours streamed across 12 different days with an average of 75 concurrent viewers over 30 days. At this level the stream is an income and the setup should be redundant. A second PC for encoding, a Shure SM7B through a RØDECaster Duo, a mirrorless camera on a dummy battery and two full-size Key Lights are the standard partner build. Add a UPS battery for the router and streaming PC so a one-second power flicker does not end a six-hour stream.
How to stream directly from PS5 and Xbox Series X|S
Both current consoles broadcast to Twitch without a PC or capture card. The quality tops out at 1080p60 and the overlays are limited, but it is the fastest way to find out if you enjoy streaming before you spend anything.
Quick steps: go live from a PS5
- Open Settings > Users and Accounts > Linked Services and link your Twitch account.
- Start the game, then press the Create button on the DualSense controller.
- Select Broadcast, choose Twitch, then set the title and video quality.
- Turn the camera and microphone toggles on or off, then select Go Live.
- Press Create again during play to see chat in the overlay or end the broadcast.
On Xbox Series X|S, install the Twitch app from the Microsoft Store and sign in. Then press the Xbox button, go to Capture & share > Live streaming, pick Twitch, set your title and resolution, and choose Start streaming. The Xbox app supports a camera over USB and shows chat in a side panel. Nintendo Switch has no built-in broadcasting; a Switch stream needs the HD60 X and a PC.
Console streamers who grow past Stage 1 usually move to a capture card so they can run OBS overlays, a proper microphone and alerts. The PS5 microphone input through the DualSense headset jack is the weak point of built-in broadcasting; even a $70 USB mic plugged into the console sounds much better.
Connecting your streaming setup to Discord
For most Twitch channels the community lives on Discord between streams. A few settings make that link work.
Connect the accounts first under User Settings > Connections > Twitch on Discord, and tick “Display on profile”. Server owners who are Twitch Affiliates or Partners can then open Server Settings > Integrations > Twitch and sync subscriber roles, which gives subs a role and private channels automatically. The sync runs about every hour.
For stream announcements, a bot does the posting. The “mee6 bot” has a Twitch notifier that posts to a channel when you go live, and most of the popular “discord bots for gaming” offer the same alert with a custom message and role ping. Set the ping role to be self-assignable so people opt in rather than muting the server.
If you host watch parties or co-stream in a voice channel, the permission that controls Go Live and camera is called “Video” in the voice channel’s permission settings. Give it to your streamer role and remove it from @everyone to stop randoms screen-sharing in your community channels. Finally, enable Streamer Mode under User Settings > Streamer Mode with “Automatically enable when streaming” ticked, so Discord hides invite links, notifications and your email the moment OBS opens.
Common streaming setup problems and fixes
| Symptom | Likely cause | Fix |
|---|---|---|
| Dropped frames in OBS stats | Upload speed or Wi-Fi | Switch to Ethernet, lower bitrate to 4,500 kbps |
| “Encoding overloaded” warning | GPU or CPU maxed | Change NVENC preset from P6 to P4, cap game FPS |
| Stream looks blocky in fast motion | Bitrate too low for 1080p | Drop output to 1664×936 or 720p60 at same bitrate |
| Mic sounds distant and echoey | Mic too far, hard room | Move mic within 10 cm, add a rug and curtains |
| Game audio in Discord recording | Single audio track | Enable separate tracks in Output > Recording, assign in Advanced Audio Properties |
| Webcam flickers under lights | Auto exposure fighting LED | Set manual exposure and shutter 1/60 in Camera Hub or Logi Tune |
| Capture card shows black screen | HDCP on PS5 | Turn off Settings > System > HDMI > Enable HDCP on the console |
| Alerts play but viewers hear nothing | Monitoring set to Monitor Only | Change to Monitor and Output in Advanced Audio Properties |
FAQ
What is the cheapest streaming setup for Twitch that still looks professional?
A PC with any RTX card, OBS Studio, a Samson Q2U on a cheap boom arm, a Logitech C920 and a bi-colour LED panel. That is about $200 of new gear on top of the PC. Audio and light are what viewers notice, and all four of those items carry over when you upgrade.
Do I need a capture card to stream PC games?
No. OBS captures PC games directly through Game Capture. Capture cards are for consoles, cameras with HDMI output and dual-PC setups.
Is 6,000 kbps the hard limit on Twitch?
It is the documented ceiling for standard broadcasting and the figure Twitch’s guidelines use for 1080p60. Enhanced Broadcasting changes the picture because it sends multiple quality versions from your PC. If in doubt, stay at 6,000 kbps with CBR and a two-second keyframe interval.
Should I buy a Stream Deck before a better camera?
Buy the Stream Deck once you are switching scenes and muting sources every stream. Buy the camera once your lighting is sorted and the webcam is the obvious weak point. For most channels under 50 average viewers, neither is more important than the microphone and the light.
How much upload speed do I need?
Plan for at least 1.5 times your bitrate in sustained upload at the time you stream. For 6,000 kbps that is a comfortable 10 Mbps. Test on Ethernet during your usual stream hours, since evening congestion is when uploads sag.
Can I use my gaming headset microphone to stream?
You can, and for a first stream it is fine. Headset mics are small electret capsules positioned off to the side, so they pick up room noise and sound thin. A $70 dynamic mic on an arm is the single biggest audible upgrade you can make.